Saturday, February 4, 2017

Our Laundry Room Renovation

This post has been a LONG time coming.  Too long, actually!

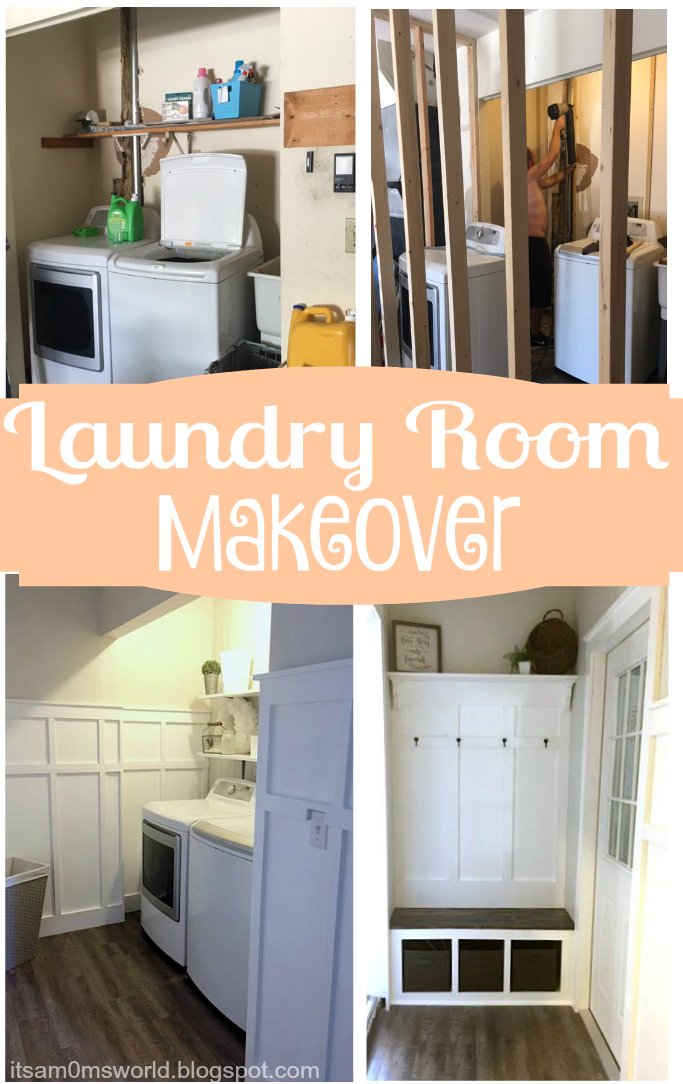
Our laundry room was kind of put on the back burner for a while since we thought fixing up a few rooms before this one was a little more important.  But I just couldn't take it anymore!  It had to get done, so we finally accomplished our goal.


This was the first room that we actually built from the ground up.

When we bought the house, we didn't have a laundry room.  We had this ....


OH. MY. SWEET. LORD.

Yes, THIS train wreck is what we had to deal with when we first bought the house.

There are really no words to describe it.  Mortifying.  Yes.  That's the word to describe it.  Absolutely mortifying.  And horrific.  And disgusting.  Well, I guess I could find a few words to describe this disaster.   Oh look, I thought of another one.

I don't need to take you through because you can obviously see how horrible it was.

So we decided to make a change.   I wanted our laundry room to be in house.  This was currently in the garage and it wasn't at all what I wanted.

So my husband framed out our room and got to work.


I didn't really take step by step pictures of what we did in between actually getting the room finished.

But it was the basics.

Framing, drywall, paint, removing the slop sink, and paneling the wall behind the washer and dryer.

I painted the whole room a horrible greenish/teal color that I thought would look beachy and instead looked like a nightmare.

But it stayed basic for a few months until we were ready to really invest some time into making the room what we wanted.

We installed DIY board and batten and built our own mudroom.  We also added some shelving above the washer and dryer and some new flooring.


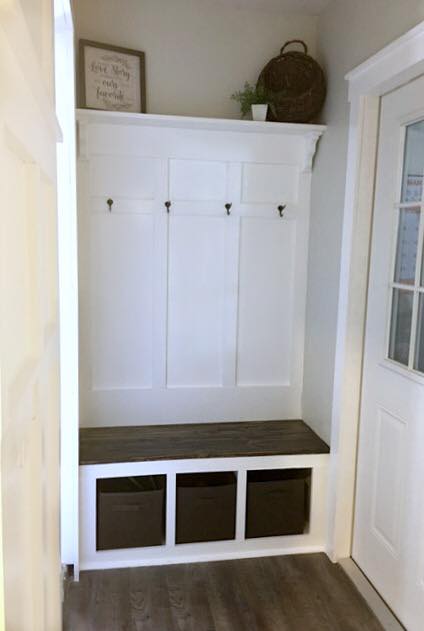
I'll be making a future blog post all about how we built our mudroom.  It was something I've always wanted and found a way to make it budget friendly and absolutely beautiful.

The only thing missing from our renovation is some new recessed lighting, a rug,  and some wall decor and that's a wrap on one room.  HALLELUJAH!

I love the transformation that took place and I actually enjoy doing my laundry now!

That's a lie.  But I love going in there to sit and stare at the overflowing hamper.


Sunday, January 15, 2017

DIY- Dress up a Window Seat For Under $30

I'm so excited to share this post with you all because I've been wanting to fix up our bay window seat for the longest time!

This was so easy, inexpensive, and had a huge impact on the look and feel of the entire room!  What can be better than that?!


From start to finish, the entire process took less than a day.  If it wasn't for the drying time after painting, it would've been completed in an afternoon.  How awesome is that?

When we first purchased our home 2 years ago, this is what the window seat looked like:


Before we moved in, we painted our entire house and this window got a few coats of primer and white paint and some new material. We also scraped down the popcorn on the ceiling of the bench and patched any holes and fixed all of the blemishes.

Here's what it looked like after all that was completed:

While it was a lot better than what it was, I thought it didn't really stand out.  So we decided to up our game and try again!

This time we opted for a dark cushion and we installed some trim and boards on the bottom wall.  We absolutely love the way it turned out!  


To me, it looks so much more custom and clean. It also looks so much fresher and more modern to me, too!


Supplies I used:


  • 3/4" quarter round
  • (2) 8 foot 1x4"
  • (1) 8 foot 1x2"
  • Semi Gloss White Paint
  • Paintable White Caulk
  • Nail Gun
Instructions:

First off, I've learned that it's much easier to tape off your wall and paint first.  Made for less cutting and easier rolling.

We taped off the material and taped off the wall making our paint line in the middle of where the 1x4" would be nailed to the wall.  Side Note:  I'm sorry about the dark night time phone pictures.  I decided to blog this very last minute.  I promise to bring you better pictures in future posts.  ðŸ˜€


We painted the wall and let it dry for a few hours.  ( I didn't take a picture of that step because I forgot).  Sorry!  :)

Next, we installed the quarter round above our existing trim (flat side facing up) to give the boards something to sit flush with.  We used a brad nail gun ( finish nail gun) for all the installation.  


Then we measured from the bottom of the bench seat to the quarter round and cut the 1x4" to that length.  Using a level, we then nailed the 1x4" to the wall.  We repeated the same steps on the other side.


Then we measured between the cut 1x4"s on the wall and cut the top 1x4" board to fit between.  Then we nailed it right underneath the bench seat to make it flush with the cushion.


Next, we measured from the cut 1x4"s on the wall right above the quarter round, and cut the 1x2" to that length.  Then we nailed it to the wall right above the quarter round.


Finally, we measured from the inside of the 1x4" on the left side to the right inside side of the 1x4 (which was 92 inches)  and divided that number by 4 putting our first board at 23 inches center.

Our second board was at 69 inches center.


The final step was to caulk all the seams and nail holes.  I taped off the bottom of the cushion to avoid any paint mistakes.


I painted it all and let it dry for a few hours between coats.  Took a total of three coats to get full coverage of the wood.

We removed the tape (after the final coat and while it was wet) and it was all finished and ready!


We absolutely love it!  And my husband has finally agreed to board and batten the rest of the wall.  Little projects like this make him see the light! Finally!

Cost Breakdown:
3/4" quarter round - $2.94
(2) 2x4" - $10.68
(1) 1x2" - $2.39
Paint - $0 --already had on hand
Caulk- $3.79
Material - $7.54 using a 40% off coupon at Hobby Lobby
TOTAL PRICE: $27.34


And that's it!  Fast, inexpensive, and super easy to complete!

Our finally makeover for this bench seat will be installing new white windows to complete the look.

We're so happy to have finished this project!  Now onto the next ........

Thursday, January 12, 2017

Our 80's Bathroom Remodel - Part 1

I bet you're surprised to see me here!  Yes.  I'm back!  I've taken quite a long time off from working on this blog.  A year to be exact!  I know.  I'm ashamed!  But I thought I'd show you guys a little of our current bathroom remodel and how far we've come in the process.

This bathroom was the first of three that we decided to tackle because it was actually the worst one of them all.  This is the bathroom that is in our daughters' room.  So while the guest bath and the master bath are used more frequently, we decided to take this remodel on first because it needed the most attention.

Now, I don't have really any pictures on my blog right now of my house because frankly, it's really a work in progress.

I can't say any one room is completely finished just yet.  Actually, can anyone say that?   I'm pretty sure there's always something to do!   But I thought I'd start sharing the progress pictures here :)

This is the first whole room renovation we've done so far.  And by that I mean this was the first room we actually tore down and built back up again.  While it's still not finished, it's pretty darn close!


To be able to see the progress, you obviously have to see what we had to start with.  So I'm going to share the pictures of when we first initially bought the house two years ago.

I'm going to take you back to where it all started.  Brace yourselves.   You might want to have a bag or bucket near by, just in case.


Do you believe THIS picture is the one that was on the initial MLS listing of our home?  Did they really think the lighting or angle was good?  Good lord.  It was bad.  I mean, REALLY bad.

As you can see there were holes everywhere, broken closet doors, outdated 80's wallpaper, and don't even get me started on the toilet and vanity.  It was a mess.  And it was one I did NOT want to clean up.

We knew we had some work ahead of us, so we slowly worked on it while trying to tackle other rooms in our home at the same time.

We started by tearing down all the wall paper and filling in holes, removing cabinets, spraying knock-down on the walls, and painting.    


I painted the vanity white and tried to work with what we had for a while just so it was somewhat "livable" when we first moved in. 


We also removed the shower doors and built up a ledge.  


While this was okay to live with for a while, I knew I really wanted to start from scratch and make this bathroom the way we wanted it. 

We ended up replacing the toilet, we knocked out that half wall, and replaced the vanity, sink, faucet, mirror, blinds, and lighting.  We also installed new flooring, new trim, and a new raised panel closet door.

We replaced all switches and outlets, we removed the old fan and replaced it with a clean white light, and changed up the exhaust fan.

Then we added some cute decor to finish off the look.


We still have some work we'd like to complete in here to finish off everything and actually be able to say this room is completely done.

I'm still waiting on the hubby to install our new door and eventually we will be changing out the window with a nice bright white window.

We are also planning to completely renovate the inside of the shower and we're going to add something to the walls, whether it be batten board or beadboard.  We haven't completely decided yet.

I'd also like to plank the ceiling to complete the look we're going for.

Take a look at a final before and after.  You can never have too many!


But that's it for now!   I feel really proud that we've come this far and are almost at the point of completion with at least one room!

I hope you'll keep checking back to see some other updates we've been working on.

I really would love to share a home tour soon but I don't think I'm quite brave enough yet.   A few more renovations, about a bazillion more Home Goods and Hobby Lobby trips and I might just do one soon! :)


Thursday, January 7, 2016

Chocolate Dipped Coconut Macaroons

Before the kickstart of my healthy eating plan and workout routine, I had to have one last hoorah before I settled down and committed to a healthier lifestyle.

And these coconut macaroons were my go to dessert.

If you love coconut even half as much as I do, you're going to absolutely adore these macaroons.

They're easy to make with minimal ingredients and they taste so amazing!

And a rule of thumb for a good coconut macaroon...don't be afraid of browning.  The more golden brown they get, the better.  What's better than toasted coconut??


Ingredients:


  • 4 large egg whites
  • 1/4 teaspoon salt
  • 1/2 cup sugar
  • 1 teaspoon vanilla extract
  • 5 1/3 cup sweetened shredded coconut (14 ounce bag)
  • 1/2 cup semi sweet chocolate chips


Directions:

Preheat oven to 350 degrees.  Line a baking sheet with parchment paper and set aside.

In a large bowl, whisk together egg whites, salt, vanilla, and sugar until foamy.

Using an ice cream scoop or your hands, scoop golf ball sized mounds of the coconut mixture and roll into a ball.

Place them onto your prepared cookie sheet, about 1 inch apart.

Bake at 350 degrees for 20-25 minutes or until the bottoms are slightly brown.

Cook for 5-10 minutes on the pan and then transfer to a wire rack to cool.

Using a microwave or over a double broiler, melt the chocolate chips.

Dip the bottom of the cooled macaroons into the chocolate and place on a sheet of wax or parchment paper to set.

Allow chocolate to cool completely before storing in an airtight container.

Enjoy!


Monday, January 4, 2016

25+ Easy & Fun Elf on the Shelf Ideas

Christmas and New Year's has come and gone again.  Can you believe it?  So in light of the holidays being over, it's time for my annual Elf on the Shelf post.


Every year I post what our elf Harry was up to for the holiday season in hopes to give some inspiration and ideas to other fellow "elfers" for the next holiday season.

This year differed from previous years, I must admit.  Mainly because...well...I was a tad lazier this year.

I don't know if it was due to the fact that I had a sleeping baby in my room so there wasn't much wiggle room to make "props" this year, the fact that I was exhausted and sick pretty much the entire month of December, or what.

But the kids enjoyed it once again this year, which makes it worthwhile to me.

So without further ado, I give you the 25+ 'some-what lazy and very easy' elf on the shelf ideas.  Here we go.

Day 1:  Harry's annual North Pole Breakfast.  You can read more about it HERE


Day 2:  Nothing tastes better than juice straight from the source.


Day 3:  Hiding a treat.


Day 4:  Even elves love Minecraft.  He's just creepin' around.


Day 5:  I think we found Waldo.


Day 6: Hangin' around.


Day 7:  Fixing himself an elf sized snack.


Day 8:  He replaced their stockings with underwear.


Day 9:  Typical elf talk.


Day 10:  He caught him!


Day 11:  School supplies all the way from the North Pole!


Day 12:  He stole that bunny's jacket to keep warm.


Day 13:  Just peepin' out.


Day 14:  The reason for the season.


Day 15:  Trying to keep warm.


Day 16:  Movie and some popcorn, anyone?


Day 17:  Found some friends.


Day 18:  Kids were a little "naughty" so he was on strike!


Day 19:  Riding along.


Day 20:  Baking some cookies.  I don't think he knows too much about appliances.


Day 21:  Didn't know if he was falling off or climbing up....


Day 22:  Brought his annual Elf Report back.  You can download yours HERE


Day 23:  Taking a nap.


Day 24:  A little surprise in Santa's milk?


Day 25:  Tic tac toe..


Day 26:  Blending in.  (sorry about the blurry picture).


Day 27:  It's time to say goodbye.  He wrote his letter (which you can download HERE).  His magic was lifted and the kids were able to hug and kiss him goodbye.


Does your family have an elf?  I'd love to see some of your ideas!

Hoping everyone had a fantastic holiday season.  Wishing you all lots of joy and peace in the new year.